Build and Explore: A DIY STEM Robot Activity for Kids
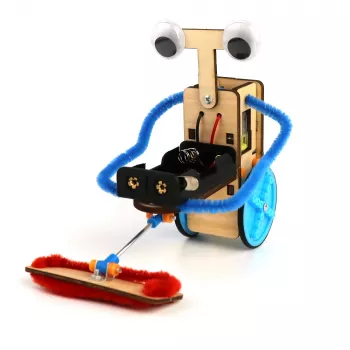
A buildable robot gives you and your child a reason to slow down, look closely, and ask how a toy comes together. Our STEM Kids 3D DIY Electric Robot Toy for Science & Learning Fun can be the center of a hands-on project: assemble it, test it according to its instructions, and talk about what you observe. You do not need to turn the afternoon into a formal lesson. A few thoughtful questions can make the building itself rewarding.
Start with the build
Introduce the robot as something to explore together, not a race to finish. Before assembly, give your child time to look over the pieces and predict where they might go. Then read the supplied instructions and set out the parts where you can both see them. A clear table or other stable workspace makes it easier to keep track of loose pieces.
As you build, pause at natural stopping points to compare your work with the instructions. If a connection looks uncertain, take another look before moving on. How much help your child needs will depend on their experience and the guidance supplied with the toy; there is no need to set a target build time.
| Stage | Try this | Question to ask |
|---|---|---|
| Before building | Set out the pieces and read the supplied instructions together. | What do you think each part will do? |
| During building | Pause to check how pieces connect before moving on. | What changed when those parts joined? |
| After building | Test the completed toy according to its instructions. | What happened, and what would you check if it did not? |
Turn assembly into a science conversation
Building offers chances to practice observation, prediction, testing, and revision. Ask your child what they expect to happen when two parts join. Later, invite them to compare that prediction with the finished build. The goal is not to get every answer right on the first try; it is to notice what happened and use that observation to decide what to do next.
If the robot does not work as expected, treat troubleshooting as part of the project. Return to the instructions, inspect the connections you can safely access, and change one thing at a time before testing again. That approach makes it easier to tell which change mattered. If an electrical step is unclear, stop and have an adult review the supplied directions rather than guessing.
You can adjust the conversation to your child. Some builders may enjoy naming visible parts or describing movement in their own words. Others may want to explain why they chose a step or keep a short record of what they tried. For more ideas about connecting hands-on activities with STEM learning, you can explore the National Science Teaching Association’s STEM education resources.
Make room for creative play
Once assembly and testing are complete, let your child give the robot a mission. It might be the subject of a story, a visitor to an imaginary planet, or the star of a drawing. Those prompts extend play without assuming the toy has features beyond its supplied instructions.
Another option is a brief observation challenge. Ask your child to sketch the finished robot and label the parts they can see, using their own words. Then compare the drawing with their first prediction: Which parts ended up where they expected? Which surprised them? You could save the sketch and revisit it before the next building session.
Celebrate the small steps as well as the completed toy. Finding a misplaced piece, asking for clarification, and carefully repeating a tricky step all show attention and persistence. Our team likes making room for those moments because they give you something concrete to discuss even when a build takes an unexpected turn.
Check the details before play
Before you open the project with your child, review the packaging and product information for the recommended age, included contents, power requirements, and any supervision directions. Follow those directions when assembling and operating the toy. An adult should handle battery or electrical setup as instructed, and small parts should be kept away from children below the age stated on the packaging.
Choose a workspace with enough room to keep pieces together, away from food, drinks, and the edge of the table. When play is over, gather any loose parts and store the toy safely. For broader toy-safety guidance, the U.S. Consumer Product Safety Commission’s toy safety resources are a useful reference.
A project worth revisiting
The first successful test does not have to be the end of the activity. On another day, ask which assembly step required the most care or what your child would do differently if starting again. You can revisit the sketch, retell the robot’s mission, or simply observe it once more and ask a new question.
If you are choosing a build-and-play project, the STEM Kids 3D DIY Electric Robot Toy gives you a starting point for that kind of shared exploration. Families interested in comparing different kinds of electronics can also browse our LED Flashlight Smart Watch with Bluetooth Calling & 100+ Sports Modes; it is a separate product, not a robot part or an accessory needed for this build.
FAQ
What can kids learn from building a DIY electric robot toy?
Building can give kids opportunities to follow instructions, observe how parts connect, make predictions, test the result, and troubleshoot. What each child takes from the activity will vary.
Can children build this robot on their own?
Check the age guidance and supplied instructions first. The help a child needs will vary, and an adult should oversee battery or electrical setup as directed.
How can families extend the activity after the robot is built?
Ask your child to sketch the robot, record observations in a build journal, or invent an imaginative mission. You can also revisit a step that was challenging and discuss what they would try next time.















Leave a comment